ZenRTC Flutter SDK #
Transform your Flutter application into a secure, production-ready communication platform with the official ZenRTC Flutter SDK. ZenRTC provides scalable calling and collaboration with built-in dashboards, meeting management, CRUD APIs, Cloudflare TURN/SFU integration and HMAC-secured APIs.
Features #
Calls & data
One-to-one and group audio/video calling with WebRTC data channels.
Meetings
Scheduled meetings with authentication, invitations and management UI.
Media infrastructure
Built-in STUN, TURN and SFU, including Cloudflare adapters.
Identity & devices
User, contact and multi-device management with CRUD screens.
Notifications
Firebase push notification integration and backend callback support.
Cross-platform
Flutter support for Android, iOS, Web, Windows and macOS.
Requirements #
| Feature | Requirement |
|---|---|
| Notifications | Firebase Cloud Messaging, Callback API or Webhooks |
| TURN server | Cloudflare account with Calls TURN enabled |
| SFU | Cloudflare account with Calls SFU enabled |
| Signaling | ZenRTC Signaling Server |
Resources #
Get API credentials #
- Create a ZenRTC account.
- Create a project in the ZenRTC Console .
- Copy your
Account ID,Project ID,API KeyandAPI Secret. - Initialize the SDK using your credentials.
Installation #
Add the package to your Flutter app, then fetch dependencies.
dependencies:
  zenrtc_sdk: ^1.0.0

flutter pub get
Example application #
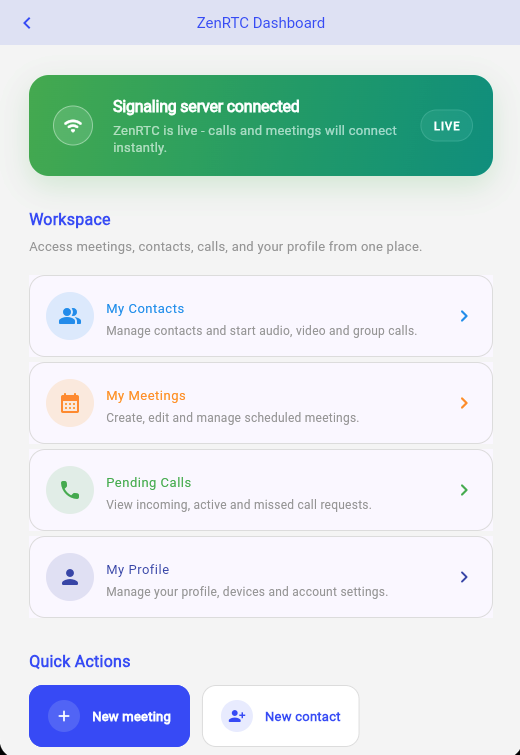
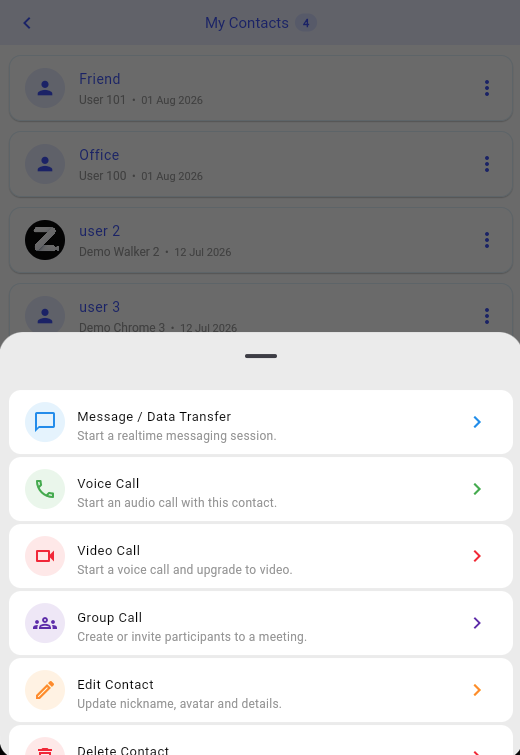
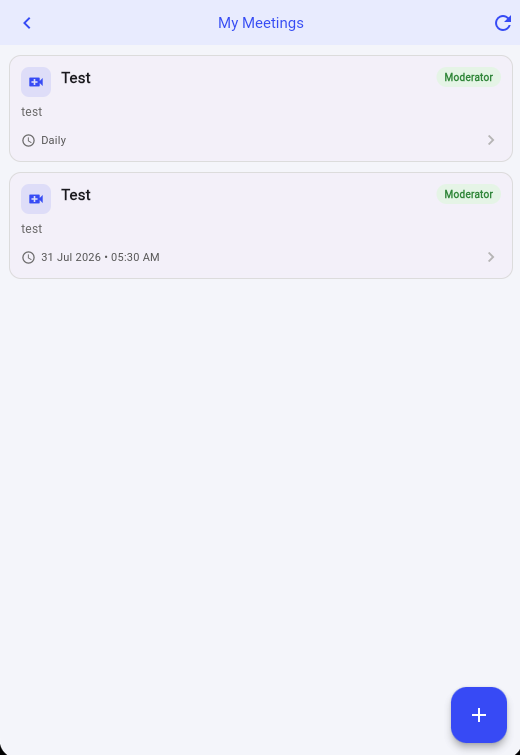
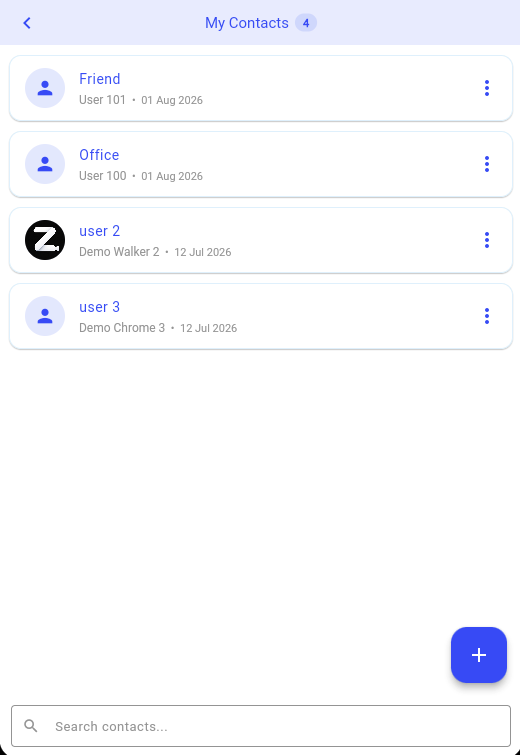
The package includes a complete Flutter example with dashboard, calls, meetings, contacts, profile, helper APIs and CRUD operations.
Initialize signaling #
final navigatorKey = GlobalKey<NavigatorState>();

Future<void> main() async {
  WidgetsFlutterBinding.ensureInitialized();

  await ZenRtcSocket.instance.ensureInitialized(
    accountId: "YOUR_ACCOUNT_ID",
    projectId: "YOUR_PROJECT_ID",
    apiKey: "YOUR_API_KEY",
    apiSecret: "YOUR_API_SECRET",
    testMode: true,
    navigatorKey: navigatorKey,
  );

  runApp(const DemoApp());
}
Wrap your application #
OverlaySupport.global(
  child: MaterialApp(
    navigatorKey: navigatorKey,
    builder: (_, child) => ZenRtcAppShell(child: child!),
    home: const HomeScreen(),
  ),
);
Connect a user #
await ZenRtcSocket.instance.setIdentity(
  UserIdentityModel(userId: "user_1", deviceId: "device_1"),
);
await ZenRtcSocket.instance.connect();
Helper functions #
ZenRTC includes navigation helpers for its built-in screens.
// Dashboard and calls
ZenRtcHelper.pushDashboardScreen(context: context);
ZenRtcHelper.pushPendingCallsScreen(context: context);

// Meetings and contacts
ZenRtcHelper.pushCreateMeetingsScreen(context: context);
ZenRtcHelper.pushMyMeetingsScreen(context: context);
ZenRtcHelper.pushCreateContactsScreen(context: context);
ZenRtcHelper.pushMyContactsScreen(context: context);

// Calling
ZenRtcHelper.pushOneToOneCallScreen(
  context: context,
  callType: CallSessionType.video,
  receiverUserId: "user_2",
);
ZenRtcHelper.pushGroupCallScreen(context: context);
Users #
Create and manage users with ZenRtcCrudClient . Each example below toggles between the Flutter SDK and its matching REST request.
Create user #
final crudClient = ZenRtcCrudClient(
  accountId: "...", projectId: "...", apiKey: "...",
  apiSecret: "...", testMode: false,
);

final response = await crudClient.createUser(
  userId: "user_1",
  displayName: "John Doe",
);POST https://api.zenrtc.com/v1/users/create
Content-Type: application/json
x-signature: <HMAC_SHA256_SIGNATURE>
{
"accountId": "YOUR_ACCOUNT_ID",
"projectId": "YOUR_PROJECT_ID",
"apiKey": "YOUR_API_KEY",
"nonce": "ab12cd34ef",
"timestamp": 1753170215000,
"userId": "user_1",
"displayName": "John Doe"
}Create multiple users #
final response = await crudClient.createUsers([
  ZenRtcUser(userId: "user_1", displayName: "John"),
  ZenRtcUser(userId: "user_2", displayName: "Alice"),
]);POST https://api.zenrtc.com/v1/users/bulk-create
x-signature: <HMAC_SHA256_SIGNATURE>
{ "users": [
{ "userId": "user_1", "displayName": "John" },
{ "userId": "user_2", "displayName": "Alice" }
] }Update or delete user #
await crudClient.updateUser(
  userId: "user_1",
  displayName: "John Smith",
);
await crudClient.deleteUser(userId: "user_1");
Devices #
"default" . Use it for single-device applications.Register device #
final response = await crudClient.createDevice(
  userId: "user_1",
  deviceId: "default",
  deviceName: "Pixel 9",
  firebaseToken: "...", // Optional
);POST https://api.zenrtc.com/v1/devices/create
Content-Type: application/json
x-signature: <HMAC_SHA256_SIGNATURE>
{ "userId": "user_1", "deviceId": "default",
"deviceName": "Pixel 9", "firebaseToken": "..." }Update, read and delete #
await crudClient.updateDevice(
  userId: "user_1", deviceId: "default",
  deviceName: "Pixel 9 Pro", firebaseToken: "...",
);

final response = await crudClient.getDevices(userId: "user_1");
await crudClient.deleteDevice(userId: "user_1", deviceId: "default");| REST operation | Endpoint |
|---|---|
| Update | POST /v1/devices/update |
| Read | POST /v1/devices/read |
| Delete | POST /v1/devices/delete |
Contacts #
Import or update multiple contacts for a user.
final response = await crudClient.createContacts(
  userId: "user_1",
  contacts: [
    ZenRtcContact(
      contactUserId: "user_2",
      displayName: "Alice",
      nickName: "Office",
      description: "Project Manager",
      emails: ["alice@example.com"],
      phones: ["+911234567890"],
    ),
  ],
);POST https://api.zenrtc.com/v1/contacts/bulk-create
x-signature: <HMAC_SHA256_SIGNATURE>
{ "userId": "user_1", "contacts": [{
"contactUserId": "user_2", "displayName": "Alice",
"nickName": "Office", "description": "Project Manager",
"emails": ["alice@example.com"], "phones": ["+911234567890"]
}] }Media quality #
Set adaptive video and audio quality according to your product’s needs.
ZenRtcSocket.instance.mediaQualityModel =
    const MediaQualityModel(
      videoQuality: VideoQuality.p720,
      audioQuality: AudioQuality.hd,
);| Video presets | Audio presets |
|---|---|
auto , p360 , p480 , p720 , p1080 , p2k , p4k | auto , voice , standard , hd , studio |
Push notifications #
ZenRTC calls this callback when your backend must send a push notification.
ZenRtcSocket.instance.onPushNotificationRequired = (payload) {
  // Send push notification from your backend.
};
License #
MIT License — Copyright (c) 2026 ZenRTC.
Permission is granted, free of charge, to use, copy, modify, merge, publish, distribute, sublicense and/or sell copies of this software, subject to inclusion of the copyright and permission notice. The software is provided “AS IS”, without warranty of any kind.